This article will outline the necessary environment setup to use Verilog-A CMLs in Cadence simulations. Before running any simulations with Verilog-A CMLs, it should be verified that all the system requirements for using the CMLs are met. These system requirements are outlined in System Requirements for Verilog-A CMLs.
Preparation for simulation with Verilog-A CMLs is a two-step process:
End users also need to install the Virtuoso Library for Verilog-A CMLs. For instructions, see Installing the Virtuoso Library for Verilog-A CMLs.
Step 1: Set up Virtuoso for Photonic Simulations
First, ensure that the Virtuoso version being used is up to date. To enable the photonics workflows, the user requires one of the following licenses from Cadence, each of which require a slightly different shell environment setup:
Virtuoso Photonics Platform (95551)
To prepare the shell environment for this license, run the following command:
setenv Virtuoso_Photonics_Platform
Virtuoso Photonics Option (95550)
To prepare the shell environment for this license, run the following command:
setenv Virtuoso_Photonics_Option
setenv Virtuoso_MultiTech
| [[NOTE:]] For more information about the available licenses, refer to the "License Checkout for Virtuoso Photonics Platform" in the Cadence document "Virtuoso Software Licensing and Configuration User Guide" |
Step 2: Add EPDA Environment to Virtuoso Working Directory
Preparing the EPDA working environment involves creating copies of files from the Lumerical release package within the user's local working directory. This does not require modification of the Virtuoso or Lumerical install packages. The environment can be set up either automatically using a script which is provided by Lumerical, or manually.
For automated EPDA environment setup, follow the guide below. Users who wish to manually set up the EPDA environment can follow the guide outlined in Manual Setup. Users who have already configured the EPDA workspace and simply want to verify a working installation can continue to the EPDA Environment Verification section.
Automatic Setup
To automatically set up the Cadence-Lumerical EPDA Environment, navigate to the Lumerical installation folder. By default, this located at /opt/lumerical/[[verpath]]/.
Within the Lumerical installation folder, navigate to /interfaces/cadence/virtuoso/. There should be two files within this folder:
- interface_install.sh is a script file which enables automatic environment setup
- README.txt is a text file that contains installation instructions. There are instructions provided within this file for manual setup, which is explained within the Manual Setup section.
Open the terminal within /interfaces/cadence/virtuoso. Next, check that the Linux environment has the PATH environment variable properly configured for INTERCONNECT, this can be checked by running the following commands:
which interconnect
If the paths returned by these commands are correct, execute the interface_install.sh script by running the following:
sh ./interface_install.sh -w /path/to/working/dir
where /path/to/working/dir is replaced with the working directory for which the EPDA environment should be set up. For more information on the options available when running this shell script, see Automatic Install Script Options.
When the interface_install.sh script is run, a message similar to the one shown in the figure below will be displayed.
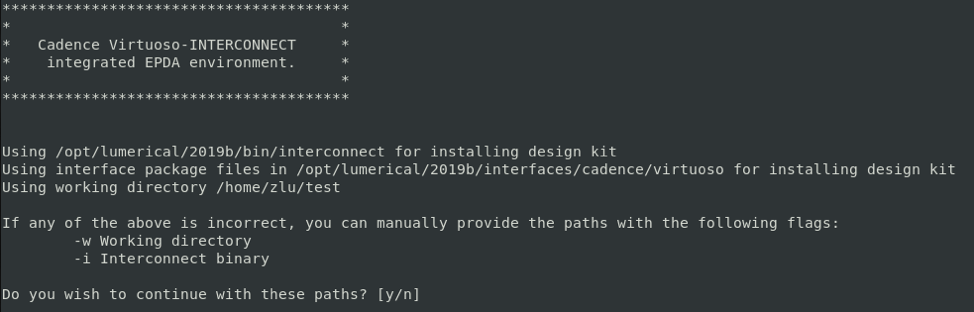
Please read the message carefully, and ensure that the paths are fully correct. If they are not, provide an input of 'n' and run the script with the necessary options outlined in Automatic Install Script Options. If all paths are correct, provide an input of 'y' to proceed. Upon proceeding, the following message will be displayed. Please follow the onscreen instructions:

Automatic Install Script Options
There are three options that can be used to specify the relevant paths for the automatic environment setup script. The first option is -w, which allows the user to set the working directory for which the environment should be set up:
sh ./interface_install.sh -w /path/to/working/dir
Where /path/to/working/dir is the path to the working directory that should be configured. The second option allows the user to specify the Cadence Virtuoso install directory, and is used with the following syntax:
sh ./interface_install.sh -c /path/to/Cadence/Virtuoso
Where /path/to/Cadence/Virtuoso is the install directory for Cadence ICADV. The final option allows the user to specify the Lumerical INTERCONNECT install directory, and is used as follows:
sh ./interface_install.sh -i /opt/lumerical/[[verpath]]/bin/interconnect
Note that this must be the full path to the interconnect executable. For non-standard interconnect install locations, the path should be changed appropriately.
After setting up the EPDA environment, it should be verified as functional by following the instructions in EPDA Environment Verification.
Manual Setup
Advanced users may want to manually set up their EPDA environment so that they can alter it to their own needs. This section will provide guidelines for the recommended EPDA environment setup. Prior to continuing, it should be verified that the PATH environment variable already contains the path to INTERCONNECT. This can be verified by running the following command:
which interconnect
If the environment variable correctly points to the INTERCONNECT installation, then proceed with the following steps to prepare the EPDA environment.
| [[NOTE]] For non-standard Lumerical install locations, update '/opt/lumerical/[[verpath]]/...' paths accordingly in the following steps. |
Step 1: Add Interface Files
Create a "menus" folder. Copy the file INTERCONNECT.menus from "/opt/lumerical/[[verpath]]/interfaces/cadence/virtuoso/menus" into this folder.
Copy the files ".cdsinit", "csfLookupConfig", "setup.loc" and "lumerical.conf" from "/opt/lumerical/[[verpath]]/interfaces/cadence/virtuoso/" into the working directory.
Create a "cds.lib" file with the following line, or add the following line if the file already exists:
DEFINE INTERCONNECTLib <directory of the file>/INTERCONNECTLib
Step 2: Install Default Design Kits
Open INTERCONNECT, and run the following script commands in the command prompt:
loaddesignkit('INTERCONNECTLibCML', '/opt/lumerical/[[verpath]]/interfaces/cadence/virtuoso/INTERCONNECTLibCML');
loaddesignkit('opticalLibCML', '/opt/lumerical/[[verpath]]/interfaces/cadence/virtuoso/opticalLibCML');
EPDA Environment Verification
If the EPDA environment is configured correctly, the user's working directory will contain the following files:
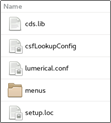
To verify that the environment configuration is functional, navigate to the working directory and launch Virtuoso. The user should be able to see the "INTERCONNECT interop" menu option in the toolbar, as shown below:
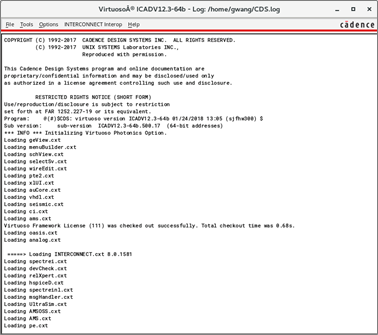
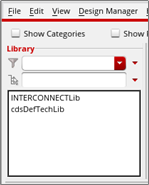
Furthermore, the user should be able to see that the Virtuoso Photonics Platform was initialized, and that the "INTERCONNECT.cxt" file was loaded by Virtuoso. Next, verify that the required libraries are present by navigating to "Tools/Library Manager" in the menu bar. The libraries should contain the following:
After verifying the presence of these libraries, the EPDA tool versions should be checked for compatibility. In the ICADV window, open the "INTERCONNECT Interop" button, and run "EPDA verions", which should produce the following console printout:
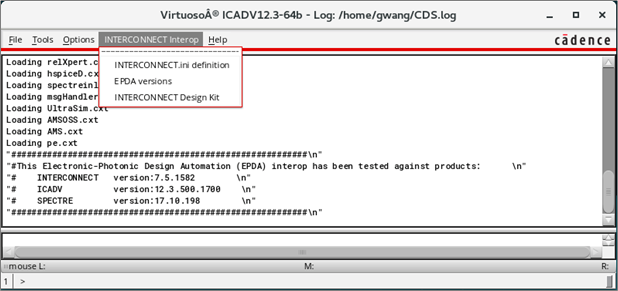
The versions printed into the console are the minimum INTERCONNECT, Virtuoso, and SPECTRE versions which are compatible with the current EPDA configuration.
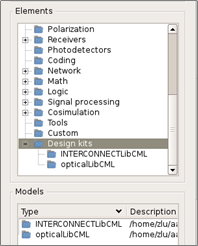
Finally, it should be verified that all of the necessary Design Kits are installed in INTERCONNECT. To check this, open INTERCONNECT, and check that the Design Kits folder in the Element Library contains the INTERCONNECTLibCML and opticalLimCML design kits: